Sweet Hearts Grape Tomato73 days. The quickest way to a gardener's heart is through a tomato, and Sweet Hearts went straight for ours! Feverishly productive, indeterminate plants continuously set loads of very uniform, crack-resistant fruit throughout the season. The ruby red morsels grow on thick clusters from branched stems. Snap off a stem and you've got mouthfuls of deliciously sweet, 1½ inch long, grape tomatoes. Resistant to Tomato Mosaic Virus, Strains 0, 1, and 2
"
Lycopersicon lycopersicum: Find out why everyone is talking about this sought after sweet and flavorful type of tomato. Grape tomatoes are aptly named because they resemble the shape and size of grapes. Top off your fresh summer greens with Morning Light and Jolly Elf. You just can't build a prettier or more delicious salad.
CULTURE: Sow seeds indoors into sterile seedling mix 6-8 weeks before your last spring frost. Plant 1/4-1/2 inch deep, water lightly, and cover with plastic or a Propagation Dome to keep the seeds from drying out. Optimum soil temperature for germination: 70-90°F. Days to emergence: 6-14. When the first set of true leaves has emerged, up-pot into 3-4 inch pots and place in an area with full light and cooler temperatures (60-70°F). This will help prevent legginess. Water carefully, allowing the soil to dry on the surface between watering, but don't let the plants wilt. Fertilize with fish emulsion every 10-14 days. Seven to ten days before you want to transplant outside, set the plants in a sheltered area outdoors to harden off. Bring in or cover at night to protect from frost. After the danger of frost has passed, transplant into well worked garden soil. Blend 1/4 cup of our complete fertilizer into the soil around each plant. If you have acid soils or have been bothered by blossom end rot, a handful of bone meal should also be added. Space determinate varieties 18-24 inches apart and indeterminate varieties 20-30 inches apart. Allow 36-48 inches between rows. If your plants have become leggy, plant them deeper; the stems will actually sprout roots. Water very lightly at first, allowing the stems to adapt. To promote early growth and better yields use season extending products such as Wallo' Waters, Kozy Coats, Solar Bell Cloches, or Red Plastic Mulch. Refer to the Garden Accessories section of this catalog.
DETERMINATE/INDETERMINATE: Determinate varieties spread laterally and therefore do not require staking. Determinate varieties ripen at once so are a good choice for gardeners who love to can. Indeterminate varieties grow vertically until the bitter end and need to be staked or trellised for best production. They produce fruit until frost, leaving you some green tomatoes at the end of the season.
INSECTS/PESTS: Non-organic options: Use Rotenone-Pyrethrin or crop row covers to discourage flea beetles early in the season, when they can be most destructive. Tomato hornworms can be controlled with Bacillus thuringienses (a bacteria also known as BT) sold as Thuricide.
DISEASES: Natural genetic plant resistance is the best form of disease control. For diseases like early and late blight, a strict 3 year rotation and a sanitation program that includes destroying all the vines at the end of the year are your best defenses. Contact your local county extension agent for more information.
SEED SPECS: Minimum germination standard: 80%. Usual seed life: 3 years. Days to maturity are calculated from date of transplanting; add 30-35 days if direct seeding. Approximately 35-40 seeds per 1/8 gram, about 300 seeds per gram; 1/4 ounce is 7 grams.
-----------
WHEN TO PLANT: Plant seeds indoors in flats six to eight weeks before your frost free date.
HOW TO PLANT: Cover the seeds; they germinate better in the dark. Keep the soil temperature as close as possible to 80°F for prompt germination. Transplant at least once, into larger flats with 2" between plants, setting the seedlings deeper than they grew before, especially if they have gotten leggy. Tomato seedlings growing indoors should be kept near 60°F to prevent overly rapid growth that is difficult to harden.
Vernalization - chilling to induce early bloom - often works well with tomatoes, but it must be done early, when the first true leaves are opening up and the plant is only about 1 1/2" tall. Night temperatures of 50°F to 55°F for two to three weeks are usually effective. Not all vegetable specialists agree that this method makes sense. If you decide to try it, treat only part of your crop so you'll have some unchilled plants for comparison.
Wait until you're reasonably sure you've had your last frost date before setting out your tomato plants. That's mid-May for us, about the time the barn swallows return. Another old rule of thumb is to set out tomato transplants when the dogwoods are in full bloom.
Set unstaked plants about 3' apart in rows 3' apart. Staked tomatoes may be planted 2' apart, and you can space cherry tomato and some early varieties as close as 15" - 18". Remember to protect them from cut worms. since spring winds can still be punishing during the last two weeks in May, I like to bury my tomato plants, parallel to the soil surface, right up to the top tuft of leaves. Dig a long, shallow trench for this, rather than a deep hole. It's too cold way down there in the ground for the roots of the warmth loving tomato, which is at its best between 70°F and 90°F.
DIRECT SEEDING: As an alternative to prestarted transplants, you might like to try direct-seeding some kinds of tomatoes. The small early cherry tomatoes and the new cold-resistant subarctics are obvious candidates for this treatment, but any except very late varieties are worth a try. Seeds planted at the time the maples bloom will wait out the early cold and germinate when the weather's right, just like all those volunteer tomatoes that grow well without any help from us. Such plants will be a bit later to come into bearing, but they'll often take over at the end of the season when the main planting is on the decline.
GROWING CONDITIONS: Good drainage and soil aeration, reasonable fertility and an ample supply of potash and phosphorus are important. Purple-leaved tomato seedlings are most likely to be suffering from a phosphorus deficiency. Dig in rock phosphate and bone meal before the final transplanting. A seedling that develops purple leaves just before it is planted out often returns to normal when transplanted to the garden row, if the soil is adequate. Avoid giving too much nitrogen during early growth; it will promote vining at the expense of fruiting. The tomato's nitrogen requirements rise a blossoming time, though, and that's when you can give the plants a boost of manure tea or diluted fish emulsion.
Mulching helps to promote even tomato growth throughout the season, but it should not be done until the soil warms up. It's often mid-june, at least, before I have my tomato patch mulched.
STAKING: Staking of tomatoes isn't necessary, but it keeps the fruit clean and promotes slightly earlier ripening. Since we've reduced the size of our tomato patch (to more than enough for two people rather then more than enough for four), we now stake our plants. Formerly, though, we let our plants sprawl on a deep mulch, trading some spoiled fruit and tangled patch for the time we'd have to spend tying the plants and pruning the sucker that appear in the leaf axils. Staked tomatoes produce more fruit per foot of row, though less per plant, than those that are not staked.
If you do stake, it's a good idea to sink the support soon after planting so you remember where you've buried the long stem of the tomato plant. Use soft cloth strips of old sheets or kit fabric to tie plants. Encircle the plant stem once, make a loose knot, and then tie a second circle with the same strip of cloth around the stake. This prevents damage to the plant from rubbing. Many gardeners report excellent results using either wooden frames set over the plants for support or surrounding teach plant with a circle of hog wire or concrete reinforcing wire with holes large enough to reach in for fruit picking.
REMARKS: Avoid planting tomatoes near walnut trees; they are extremely sensitive to the toxin juglone, which is exuded by walnut tree roots. They are also sensitive to unnatural chemicals in the soil and vulnerable to diseases spread by tobacco users. Indoors, natural gas leaking from cooking stoves or other appliances may retard tomato seedlings.
----------
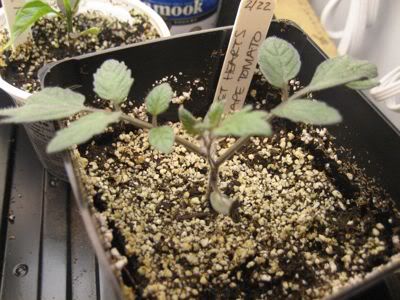
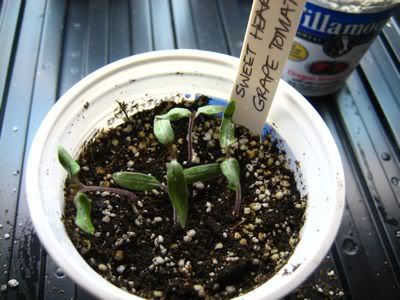
These are far more then I would normally spend on seeds, but I was seed shopping on Valentines Day and my baby girl *loves* grape tomatoes. Loves. How could I then resist? Sweet Hearts for my Sweet Heart on Valentines Day. I hope they live up to my expectations!PURCHASED: 15 seeds from Territorial Seed Co. Feb '09. $7.05. Started seeds on 02/22/09 in a yogurt cup on the heat mat. Covered with plastic wrap and chip bag to keep them in the dark. They came up in 3 days! 02/25/09. Moved them off the heat mat and uncovered them. Did a diluted seaweed feed on 3/2/09.
STARTED SEED: HARDENED OFF: TRANSPLANTED IN GARDEN:DISEASE ISSUES:INSECT ISSUES:HARVEST YEILD & DURATION:OTHER NOTES:03/02/09
03/16/09
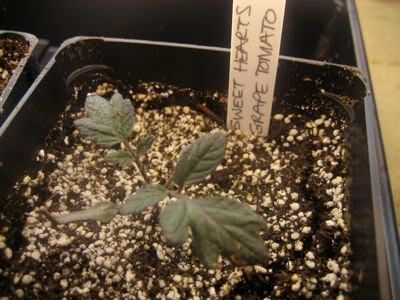
03/23/09