Well I should've been cleaning the inside of my house BUT it was nice and sunny there for a while and only cool outside (mid 40's) instead of freezing AND it's supposed to snow this weekend and I won't be able to get to the yard with the million activities lined up for the next three weeks, sooooo I decided to go play in the garden instead! How's that for a run-on sentence? Heh. It was really nice to get out in the fresh air for a while.
I actually divided some of the wine colored bearded iris. They were sprouting big bulbs up and onto the sidewalk! So I pulled them up and went and planted them in the neighbors yard. (With permission of course) She doesn't really garden but likes flowers so it's perfect. ;^) I did sneak three of them into the neighbors across the street though without asking. I am the devious flower fairy! She's always telling me how much she loves all the flowers and plants in our front yard - so what the hey? I figure if they pop up and she doesn't like them I'll take them back and plant them somewhere else in my yard.
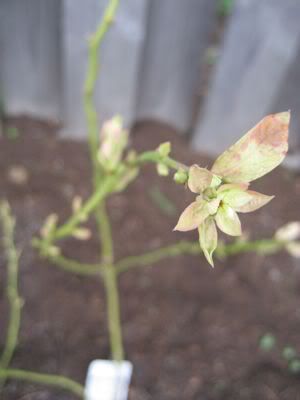
I also cut back all the canna and daliah's which were *still* blooming!, not much but there were three or four flowers hangin' in there. I got a little bit of weeding done too. Mulched a few beds (to protect the canna bulbs especially). Hoed up the weeds that are popping up the blueberry bed. I really wanted to have put the bark mulch down on that bed by now but I honestly don't think it's gonna happen before next year. Phoo. I still have about 1/2 yard or so of compost that's sitting out by our garage that I also need to shovel into the garden beds. It would be great if I could get to that but I don't think it's going to happen for a while.
Wednesday, December 10, 2008
Sunday, December 7, 2008
Saturday, December 6, 2008
Old Man Winter
Just when I was starting to think it would perpetually be fall, we finally had our first hard frost last night. It was stayed frosty till about 10 this morning. I can finally cut down the canna's and daliah's tomorrow. Yay - yard clean up!
Monday, November 24, 2008
A garden nut's book review...
Can I just say that I'm reading Animal, Vegetable, Miracle a Year of Food Life by Barbara Kingsolver and am seriously *loving* it? Cause I am. I am such a garden nut. I keep wanting to transcribe whole paragraphs here but realized that it was about every other one... I might as well just type up the whole book! lol... or you know, you could just go read it, n' stuff.
Sunday, November 23, 2008
Slow Progress
I managed to muck about in the garden for a few hours before lunch. Got more of the compost** into the raised beds and was able to dig out two more walkway areas. I know it never sounds like much but I was sweating! And it was cold out! Really - at this rate I will never need a gym membership. I'm also excited because on Friday we're going down to DH's Uncle's house for a big family post-Thanksgiving Thanksgiving thing and we're bringing 'Ol Penny (our truck) to pick up some scrap wood from him we can use to frame out some more beds and walkways with! Oh, and it'll be nice to visit with them too I guess. ((Heehee)) I'll take some pictures as soon as it looks like I've done anything!
**Note to self: Do not leave a giant pile of oderiffic compost in the back alley for any length of time as the local feline population will use it as largest most magnificent kitty litter box - ever! ::stupid poopy cat poop::
**Note to self: Do not leave a giant pile of oderiffic compost in the back alley for any length of time as the local feline population will use it as largest most magnificent kitty litter box - ever! ::stupid poopy cat poop::
Friday, November 21, 2008
Fall Cleanup
It was crisp out - 46° but it felt great to go outside and rake leaves and snip away the last of the dying bulbs. Of course there's still loads to do (when isn't there?) but I filled one of the 60 gallon yard recycling bins so for now I'll call it good. I have one more bin which I could also easily fill - too bad they only pick them up once every other week. We called it a day when the babe started complaining her hands were cold. It looks good! I can't believe that we're still getting dahlias. I thought about cutting them to the quick but couldn't bring myself to do it as they're so prolific! I left the canna's in too for now. The edges of their leaves are starting to brown with the colder temperatures but they've still got a week or two of life in them still.
Thursday, November 13, 2008
I. Am. So. Tired!
Oh man. Who needs a gym when you can build garden beds and re-landscape your back yard?
I. Am. So. Tired!
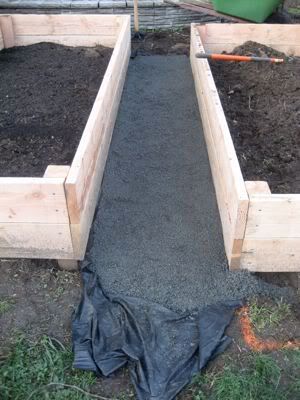
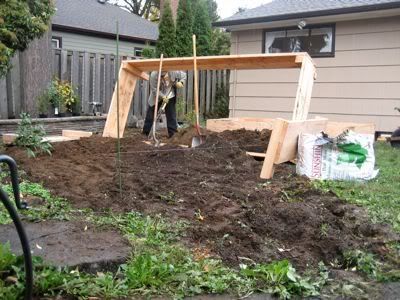
I have a feeling too that tomorrow that sentence will read: I am so sore! I raked up one dogwood's worth of fallen leaves while waiting for compost to show up. Once it got here I shoveled 1/2 yard of compost into the blueberry bed and 1/2 yard into one of the raised beds. I shoveled up a bunch of really wet heavy clay-e clumpy soil (it's been pouring here for days so the earth is *soaked*) out of the walkways between the beds and into the beds...
Picture of pre-dug clumpy heavy wet dirt
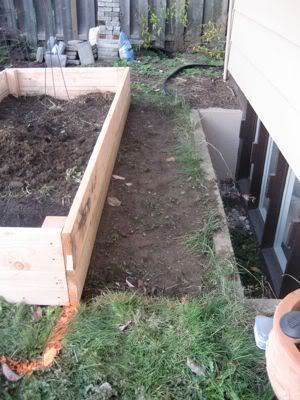
...then raked it up, tamped it down and lined it with landscape fabric.
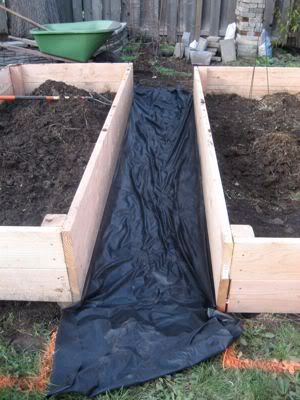
Ran off to the rock place and picked up 1/2 yard of 1/4" minus crushed aggregate which was also soaked by the rain. For those of you who haven't had the pleasure of shoveling wet 1/4" aggregate, it's akin to shoveling wet cement. Bleh. Anyway I got nearly all it into one of the walkways, leveled it, raked it and tamped it down. It looks *awesome*! I think so anyway. I just wish it was all done! So much more to do...
Whew~
And of course overall, it looks like I did - nothing.
lol... ah well. I think it's supposed to be sunny tomorrow too so if I'm not too dead I guess I'll be back at it. I do have other things on the docket though so it won't be the all day endeavor that it was today. I was also thinking that I could do little ground level beds in front of the raised ones. I would plant things that were good insect attractants like lavendar (bees) and insect repellents like nasturtiums (aphids, squash bugs & striped pumpkin beetles) and peppermint (white cabbage butterflies) etc. while the 1/4" minus would continue in a little path around it. Of course that means I need to convince DH to get the tiller back out and churn up some more of our so called lawn. Heh.
I. Am. So. Tired!
I have a feeling too that tomorrow that sentence will read: I am so sore! I raked up one dogwood's worth of fallen leaves while waiting for compost to show up. Once it got here I shoveled 1/2 yard of compost into the blueberry bed and 1/2 yard into one of the raised beds. I shoveled up a bunch of really wet heavy clay-e clumpy soil (it's been pouring here for days so the earth is *soaked*) out of the walkways between the beds and into the beds...
Picture of pre-dug clumpy heavy wet dirt

...then raked it up, tamped it down and lined it with landscape fabric.

Ran off to the rock place and picked up 1/2 yard of 1/4" minus crushed aggregate which was also soaked by the rain. For those of you who haven't had the pleasure of shoveling wet 1/4" aggregate, it's akin to shoveling wet cement. Bleh. Anyway I got nearly all it into one of the walkways, leveled it, raked it and tamped it down. It looks *awesome*! I think so anyway. I just wish it was all done! So much more to do...

Whew~
And of course overall, it looks like I did - nothing.

lol... ah well. I think it's supposed to be sunny tomorrow too so if I'm not too dead I guess I'll be back at it. I do have other things on the docket though so it won't be the all day endeavor that it was today. I was also thinking that I could do little ground level beds in front of the raised ones. I would plant things that were good insect attractants like lavendar (bees) and insect repellents like nasturtiums (aphids, squash bugs & striped pumpkin beetles) and peppermint (white cabbage butterflies) etc. while the 1/4" minus would continue in a little path around it. Of course that means I need to convince DH to get the tiller back out and churn up some more of our so called lawn. Heh.

Tuesday, November 11, 2008
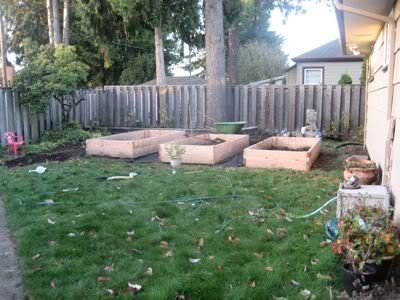
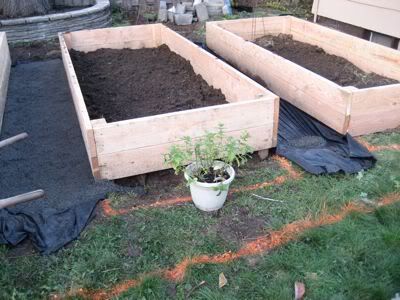
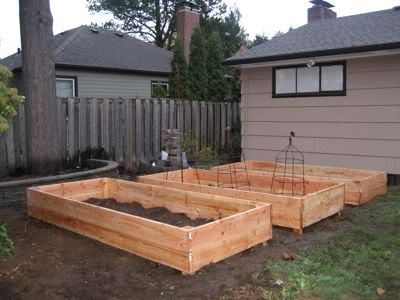
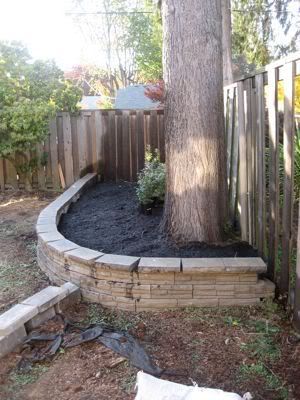
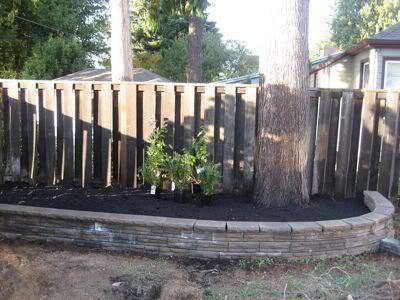
Garden beds in! Blueberries planted!
It was a very productive weekend for the mud monkey family. We got a lot done in the back yard and after waiting four loooong years I finally got my raised garden beds in! I'm beyond ecstatic... possibly euphoric. I *LOVED* having a kitchen garden and it's been a long time in coming since we moved here that I have one again. I'm dreaming of beautiful fruit and vegetables next year. I'm drooling over seed catalogs and trying to figure out how I can cram all the things I want to grow into such a small space - I have four years to catch up on! For example I need purple carrots. Why? I dunno, cause now I CAN. lol...
I'm almost even more excited just about the fact that the weeds will be gone (at least in this section of yard). There's structure and purpose now! I'm really stupidly happy. Really.
So Friday DH took the kiddlet and went to borrow a garden tiller. When they got back he tilled up the blueberry bed then I asked if he'd till up the lawn where the raised beds would go someday ::blink-blink:: Little did he realize my plot to get them in this week. It worked better then I thought though as they're in there tonight! But I digress.
On Friday after he tilled the blueberry bed I did a soil test to see where the pH level was. For blueberries it needs to be acidic (4.5 - 5.0) but my test came out neutral (7.0). It seemed off to me. I assumed that this soil would be acidic as it sits under an evergreen tree that drops it's needles all the time. Plus with the higher amounts of rain we get here our soil tends to be acidic anyway. I was really surprised by a neutral reading. So I picked up a pH soil meter on Saturday and plunked it in the ground and also got a pH reading of 7.0. Oooookay. So I stuck it in peat moss (a highly acidic soil amendment) and got a reading of 7.0. I'm taking the damn meter back. lol... Ah well. I still don't know exactly what my pH is and I could have the county extension office run a soil test but that'd put me back $50 I don't have. So I crossed my fingers and added sulfate to the bed (an amendment that makes the soil more acidic). Hope I didn't over do it! Anyway it's done now! I know it doesn't look like much but those little bushes in the front will fill out 3' round and high. The two bushes in the back should get anywhere from 5' to 8' high and flush out as well. Once matured the yield should be about 10lb of berries a bush. *Almost* enough to keep kiddlet happy. The little blueberry junkie that she is. ;^)
The rest of our time was spent working on the building the beds... It went okay except for the point where we ran out of screws and it started raining on us. Oh, and it's cold. I think the warmest it got today was 56°, it just got colder as the afternoon wore on.
IN PROGRESS
BEFORE & AFTER
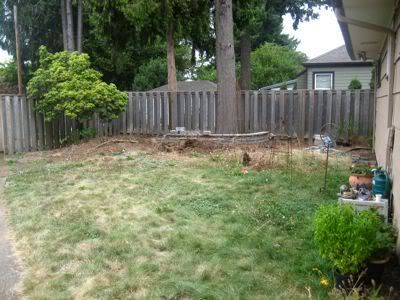
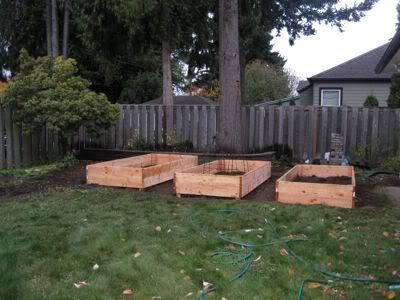
There is still more to do of course - fill the beds with compost and other yummy amendments - till them up. Add a top layer of compost to the blueberries and then mulch them with bark mulch. Plan out next years garden... but I'll have all winter for that last bit. Mmmm seed catalogs here I come!

I'm almost even more excited just about the fact that the weeds will be gone (at least in this section of yard). There's structure and purpose now! I'm really stupidly happy. Really.
So Friday DH took the kiddlet and went to borrow a garden tiller. When they got back he tilled up the blueberry bed then I asked if he'd till up the lawn where the raised beds would go someday ::blink-blink:: Little did he realize my plot to get them in this week. It worked better then I thought though as they're in there tonight! But I digress.
On Friday after he tilled the blueberry bed I did a soil test to see where the pH level was. For blueberries it needs to be acidic (4.5 - 5.0) but my test came out neutral (7.0). It seemed off to me. I assumed that this soil would be acidic as it sits under an evergreen tree that drops it's needles all the time. Plus with the higher amounts of rain we get here our soil tends to be acidic anyway. I was really surprised by a neutral reading.
 So I picked up a pH soil meter on Saturday and plunked it in the ground and also got a pH reading of 7.0. Oooookay. So I stuck it in peat moss (a highly acidic soil amendment) and got a reading of 7.0. I'm taking the damn meter back. lol... Ah well. I still don't know exactly what my pH is and I could have the county extension office run a soil test but that'd put me back $50 I don't have. So I crossed my fingers and added sulfate to the bed (an amendment that makes the soil more acidic). Hope I didn't over do it! Anyway it's done now! I know it doesn't look like much but those little bushes in the front will fill out 3' round and high. The two bushes in the back should get anywhere from 5' to 8' high and flush out as well. Once matured the yield should be about 10lb of berries a bush. *Almost* enough to keep kiddlet happy. The little blueberry junkie that she is. ;^)
The rest of our time was spent working on the building the beds... It went okay except for the point where we ran out of screws and it started raining on us. Oh, and it's cold. I think the warmest it got today was 56°, it just got colder as the afternoon wore on.
IN PROGRESS


BEFORE & AFTER


There is still more to do of course - fill the beds with compost and other yummy amendments - till them up. Add a top layer of compost to the blueberries and then mulch them with bark mulch. Plan out next years garden... but I'll have all winter for that last bit. Mmmm seed catalogs here I come!
Friday, November 7, 2008
I always wanted a "pet" bat...
Maybe I'll get a bat house for Christmas?
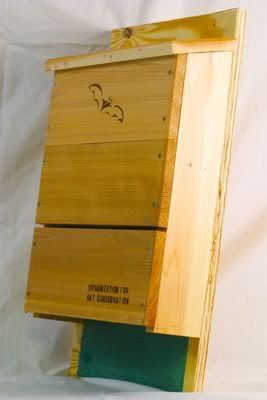
Source
How And Where To Put Up A Bat House
In Northwestern states, bat houses need at least six to eight hours of direct sun daily. It is very important for nursery colonies to raise their young under warm conditions. You should even paint your bat house black to absorb more heat. Use a non-toxic, latex paint for your house and only paint the outside. Remember that where you mount your bat house plays a major role in the internal temperature. Houses can be mounted on such structures as poles, sides of buildings and tall trees without obstructions. Houses placed on poles and structures tend to become occupied quicker than houses placed on trees. Houses should face south to southeast to take advantage of the morning sun. Your bat house should be mounted at least 15 feet above the ground, the higher the house the greater the chance of attracting bats. Bats return from migration and awaken from hibernation as early as March in most of the U.S., but stay active year-round in the extreme southern U.S. They will be abundant through out the summer and into late fall. Most houses used by bats are occupied in the first 1 to 6 months (during the first summer the bat house was erected). If bats do not roost in your house by the end of the second summer, move the house to another location.
What types of bats can I expect to see in my bat house in the Northwestern states?
Some of the most common bat species to occupy bat houses in northwestern states are as followed: pallid bat (Antrozous pallidus) a large pale colored bat with large ears, little brown bat (Myotis lucifugus), big brown bat (Eptesicus fuscus), Yuma myotis (Myotis yumanensis), and Mexican free-tailed bat (Tadarida brasiliensis), all of which are light to dark brown in color. For more information on identifying bats check out "Stokes Beginners Guide to Bat Identification."
Saturday, November 1, 2008
Another reason to go organic
I thought this was a sad but very interesting article.
What's Causing Bats to Drop Like Flies?
Researchers look beyond white-nose syndrome as the prime suspect in the mysterious deaths of bats in the U.S. Northeast
The mortality rate of the bats is guestimated at 97%. Researchers are linking two of the three main reasons for their deaths to pesticides and insecticides but have no conclusive evidence as of yet. It just breaks my heart. I hope they're able to figure out what's causing the problem and help to correct it before it's too late...
"Kunz and his team are approaching the mystery from three different angles: The first is to study the body weights of hibernating bats in different geographic areas by collecting samples of the creatures from three caves in the affected areas and from three caves in Ohio and Pennsylvania, where white-nose syndrome does not appear to have struck. Similar to Blehert's approach, this will inform Kunz and his team of whether the bats in the areas hit by the syndrome are beginning hibernation with the right amount of stored fat. If not, this might signal that pesticides are diminishing local insect populations, possibly choking off a primary food source for the bats.
The second angle is to determine whether the animals are storing the right type of fat (unsaturated fatty acids obtained by eating insects) for their dormancy, Kunz says. A lack of unsaturated fatty acids could again lead the scientists back to suspect declining local insect populations from insecticide use.
A third area to investigate is whether the bats' immune systems are being suppressed for some reason, making them more susceptible to fungal infection. "There's no smoking gun at this point," Kunz says, but he and his colleagues are collecting bat samples at this time and hope to have some results by December.
One possible bright spot is that some of the lesions on dead bats that Blehert and his colleagues examined had begun to heal before the bats died, which indicates that the bats are capable of fighting the infection to some extent. The researchers plan to spend this winter studying the effect of this fungus on healthy bats in the lab. Blehert says he will be surprised if the fungus alone was the sole culprit behind the plummeting bat population. "I'm not sure a fungus," he says, "can kill an otherwise healthy animal."
Thursday, October 30, 2008

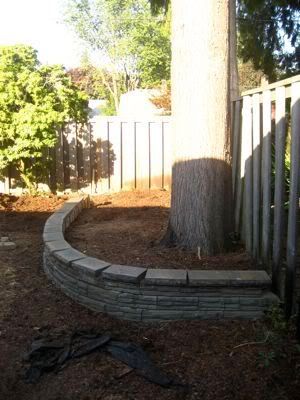
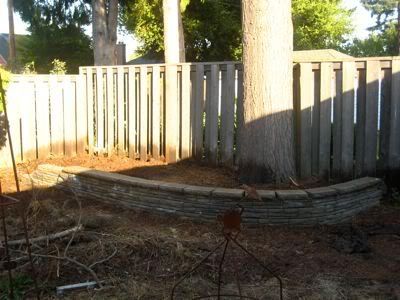
Finis!
The wall is done but still so much more to do!
Before
After!
I've amended the bed with slow release fertilizer for acid loving plants as well as phosphate to help root development this fall and of course 1/2 yard of compost. Now I just need to till the bed and check the ph level to see if I need to add anything further before planting the blueberries.
Before

After!


I've amended the bed with slow release fertilizer for acid loving plants as well as phosphate to help root development this fall and of course 1/2 yard of compost. Now I just need to till the bed and check the ph level to see if I need to add anything further before planting the blueberries.
Crop Rotation
Bill Thorness of the Seattle Times published a great article on crop rotation. He suggests using the mantra, "leaf, root, flower, fruit" to guide you in planning. By rotating crops in this way, you reduce the burden on the soil, manage overwintering pests and keep plants healthy. Crop rotation is important to all kinds of gardening, but particularly organic gardening. Practicing good rotation methods protects the soil you have worked so hard to build and keeps the pests down to a dull roar.
Monday, October 27, 2008
It's done! It's done!
The garden wall is done! Yay!
::does a happy jig::
Now I just need to till and amend the soil and plant my blueberries - gah.
PS: Will post pictures soon!
::does a happy jig::
Now I just need to till and amend the soil and plant my blueberries - gah.
PS: Will post pictures soon!
Southern 'Sunshine Blue' and Northern 'Berkeley' Highbush Blueberries
Common Name: Blueberry Bush (Southern highbush blueberry)
Botanical Name: Vaccinium corymbosum 'Sunshine Blue'
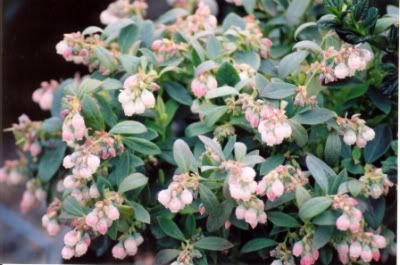
Planting Time: Fall
Flowering Time: Dainty, waxy, bell-shaped, white flowers appear in May.
Harvesting Time: Mid Season - June. Birds love the fruit, so plants may need to be covered with netting as the fruit begins to ripen. Large tangy berries.
Light: Full Sun - 6 hours to partial shade
Girth: 3' x 3'
Soil: Blueberries are best grown in acidic (pH 4.8-5.2), organically rich, well-drained soils in full sun to part shade. Young plants need extra phosphorus to encourage good root development. Look for a fertilizer that has phosphorus, P, in it(the second number on the bag.) Apply recommended amount for plant per label directions in the soil at time of planting or at least during the first growing season. It is best to avoid fertilizing late in the growing season. Applications made at that time can force lush, vegetative growth that will not have a chance to harden off before the onset of cold weather.
Growth rate:
Prune: Southern highbush plants have low winter chilling requirements. Chilling is a measure of accumulated hours of temperatures below 45°F in the dormant season. Low-chill varieties can be pruned after the first flush of fruit to induce a second crop later in the year. Prune plants as needed in late winter beginning the third year after planting.
Other: Requires consistently moist soil; do not let dry out between waterings. Although blueberries are self-fertile, cross-pollination produces the best fruit crop (larger berries and larger yields). Dark-green leaves turn eye-catching shades of red and purple in fall. Reddish stems can be attractive in winter. USDA Hardiness Zones 5-9.
Year Planted: Fall 2008 (Plants already two years old)
03/02/09

03/23/09
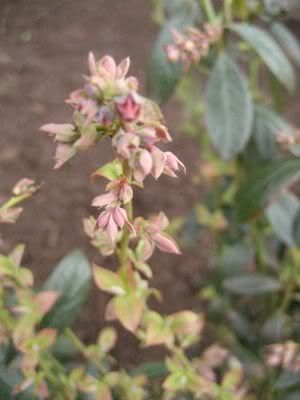
Common Name: Blueberry Bush (Northern highbush blueberry)
Botanical Name: Vaccinium corymbosum 'Berkeley'
Planting Time: Fall.
Flowering Time: White, sometimes pink tinged flowers to 1/2 inch across are held in pendant terminal racemes.
Harvesting Time: Large mild berries. Mid to late season harvest / June - July.
Light: Sun to Partial Shade
Girth: Height: 10-12 ft. (3-3.6 m) Spacing: 6-8 ft. (1.8-2.4 m) (I've seen other descriptions that note it only grows 6 - 8 ft)
Soil: 4.6 to 5.0 (highly acidic). Young plants need extra phosphorus to encourage good root development. Look for a fertilizer that has phosphorus, P, in it(the second number on the bag.) Apply recommended amount for plant per label directions in the soil at time of planting or at least during the first growing season. It is best to avoid fertilizing late in the growing season. Applications made at that time can force lush, vegetative growth that will not have a chance to harden off before the onset of cold weather.
Growth rate:
Prune:
Other: Introduced in 1949 it is hardy in zones 5-8. Requires consistently moist soil; do not let dry out between waterings. Bright yellow wood in the winter contrasts nicely with red wooded varieties. Avoid planting in colder exposed areas or areas prone to frost pockets.
Year Planted:
03/30/09

Blueberry Varieties
Blueberry varieties I picked up the other day...
Name: Vaccinium corymbosum 'Sunshine Blue'
Common name: 'Sunshine Blue' Southern highbush blueberry.
Family: Ericaceae.
Description: Edible and ornamental highbush blueberry. Grows into a dense, rounded, semi-dwarf plant to 3-4-feet high and wide.
Hardiness: USDA Hardiness Zones 5-9.
Landscape uses: Edible landscaping, containers, mixed borders, hedges, native plant gardens, open woodlands.
Name: Vaccinium corymbosum 'Berkeley'
Common name: 'Berkeley' Northern highbush blueberry.
Family: Ericaceae.
Description: Edible and ornamental highbush blueberry. Grows to 6 - 8 feet high and wide.
Hardiness: USDA Hardiness Zones 5-8.
Landscape uses: Edible landscaping, containers, mixed borders, hedges, native plant gardens, open woodlands.
Saturday, October 25, 2008
Bluuuuuuueberries!
DH is "evil"... he made me go to the Farmer's Market with him this morning and then made me buy blueberry bushes. Oh, dang! ::laughs happily:: I better get crackin' on finishing that bed up so there's some place to plant them!
Thursday, October 16, 2008
A few things still blooming...
Even with the colder temperatures coming on as autumn bares down on us a few stragglers are still flowering away.
The daliah's continue to be most prolific. They're even making friends.
This is a deep chocolate Canna that was in a bad spot for a couple of years and never got bigger then a leaf or three. I moved it this spring and now it's three feet tall! and trying to bloom for the first time since I brought it home. I hope it does - I've forgotten what color the flower is, though it hardly needs it - the foliage is georgous in and of itself. (Guess I'll have to go take a picture of the whole thing now!)
And the sunflowers of course... summer embodied.

The daliah's continue to be most prolific. They're even making friends.


This is a deep chocolate Canna that was in a bad spot for a couple of years and never got bigger then a leaf or three. I moved it this spring and now it's three feet tall! and trying to bloom for the first time since I brought it home. I hope it does - I've forgotten what color the flower is, though it hardly needs it - the foliage is georgous in and of itself. (Guess I'll have to go take a picture of the whole thing now!)

And the sunflowers of course... summer embodied.

Note to self
Must get Chocolate Daisy's (Berlandiera lyrata) to plant next year! Who wouldn't want flowers that smell like *chocolate*?!
And an Ambrosia Apple Tree, not sure if I can buy a tree commercially but I'll start looking. Best apples yet.
And an Ambrosia Apple Tree, not sure if I can buy a tree commercially but I'll start looking. Best apples yet.
Wednesday, October 15, 2008
It's a conspiracy!
My health is conspiring against my garden! I'm sure of it. I managed to twank my back again, just for these past few nice sunny fall days. If I could've I would've finished the wall. As it was I irritated the hell out of it by planting some bulbs despite the pain. I'm feeling a little more upright today and so of course look out the window tonight to discover that it's rained. Ug. I did not get as far as I'd planned this year with the yard. I wish I'd gotten further. I hope I can get the stars to align before it starts to get really cold.
Saturday, October 11, 2008
The never ending wall project
Oh! I'm so close! I really thought I had enough blocks to finish the wall - looks like one more trip to the store should do it. I'm excited to get this done.
Wednesday, October 1, 2008
Blueberries *Nom, nom, nom*
Haha! Looks like Vaccinium corymbosum (Northern Highbush Blueberry) will be the perfect plant for my new bed. I don't think I could've planned it any better! I've got all winter to perfect the Ph in the soil. Don't know if I can wait the recommended one year between soil prep and actual planting though.... I love blueberries!
Everything you wanted to know about growing blueberries in your home garden in the lovely green state of Oregon
Everything you wanted to know about growing blueberries in your home garden in the lovely green state of Oregon
Tuesday, September 30, 2008
The Wall
So close! I managed to get quite a bit done with the help of my MIL. Then threw out my back. Waaa! It's supposed to rain the next five days too. I really wanted to finish this today (the last sunny day for a while) but since I'm down for the count it doesn't look like it'll happen. ::pouts:: Since my last update Little Miss S and I did plant over 100 bulbs. She loved it! We counted bulbs and she got to help shovel dirt and pat it back down. One day after we'd cleaned up the house in the morning I turned to her and asked, "You can do anything you want to today. What should we do?" (I was thinking park, zoo, etc) She looks at me and says, "Flowers!" Awwww - that's my girl!


Tuesday, September 23, 2008
Perennial Plant List
I will attempt to document my perennial plants here but because I started my garden four years before I started this blog this will continue to be a work in progress. I have a lot of plants! Sadly I don't always remember what I have and have forgotten the names of a few - so I will add to this this as I have time. Enjoy!
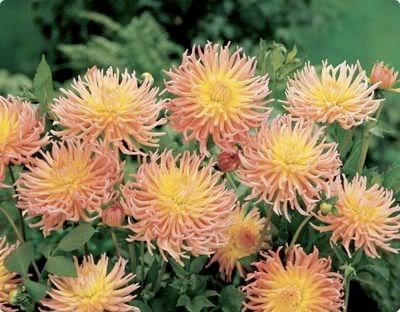
Common Name: Sunshine Dahlia
Botanical Name:

Planting Time: Spring (Feb-May)
Flowering Time: July till Frost
Light: Full Sun
Girth: 14" high x 12-20"
Soil:
Growth rate:
Prune: Dead head to promote more flower growth
Fertilize:
Other: Hardy in zones 8-10 otherwise dig up and overwinter in dry peat - plant again the following spring.
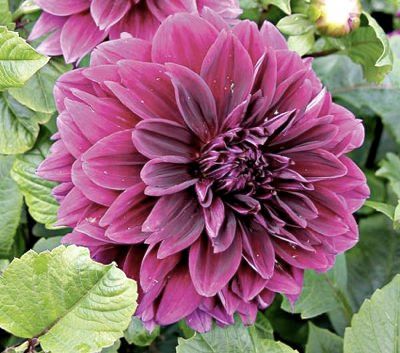
Common Name: Alfred Grille Dahlia
Botanical Name:
Planting Time: Spring (Feb-May)
Flowering Time: July till Frost
Light: Full Sun
Girth: 36" high x 12-20"
Soil:
Growth rate:
Prune: Dead head to promote more flower growth
Fertilize:
Other: Propagation Methods:
Common Name: Thomas A. Edison Dahlia
Botanical Name:
Planting Time: Spring (Feb-May)
Flowering Time: July till Frost
Light: Full Sun
Girth: 36" high x 12-20"
Soil:
Growth rate:
Prune: Dead head to promote more flower growth
Fertilize:
Other: Propagation Methods:
Common Name: Anemone 'Royale'
Botanical Name:
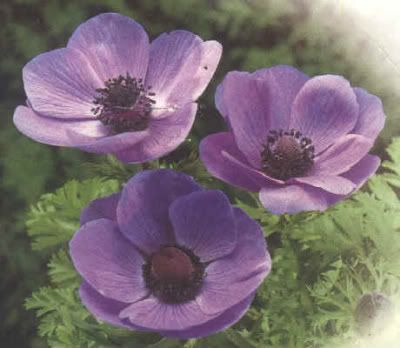
Planting Time:
Flowering Time: Spring
Light:
Girth:
Soil:
Growth rate:
Prune:
Common Name: Autumn Fern
Botanical Name: Dryopteris erythrosora
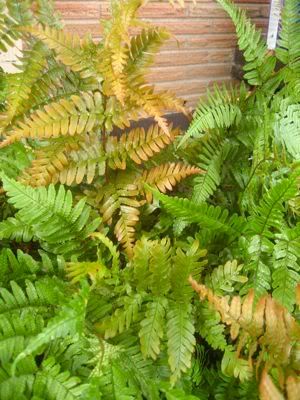
Planting Time:
Flowering Time: No flowers, evergreen
Light: full shade / part shade
Girth: 18-24" high, 2' between plants
Soil: Plant in moist, rich, well drained soil in partial shade
Growth rate: Slow
Prune: In spring, when new fronds begin to unfurl, cut back spent foliage
Fertilize:
Other:
Common Name: Blue Star Creeper
Botanical Name: Laurentia fluviatilis
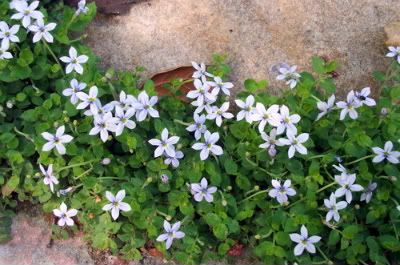
Planting Time:
Flowering Time: May to Sept
Light: sun to partial shade
Girth: 2" high, spreading
Soil: Will tolerate most soils and foot traffic
Growth rate:
Prune:
Fertilize:
Other: Propagation Methods: By dividing the rootball
Common Name: Bronze New Zealand Flax
Botanical Name: Phormium tenax 'Atropurpurea'
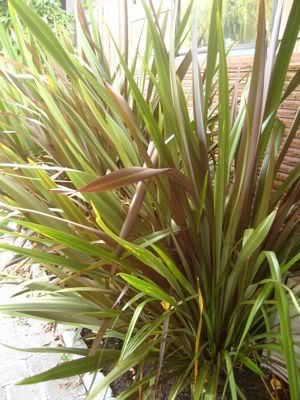
Planting Time:
Flowering Time: late spring, evergreen
Light: full sun / partial sun
Girth: 6-8' high, 2' between plants
Soil: Plant in most any well-drained soil
Growth rate:
Prune:
Fertilize:
Other: This is the red foliage form of the species and is one of the toughest of the New Zealand Flax - tolerates inland heat and colder temperatures than most of the hybrids.
Common Name: Christmas Fern
Botanical Name: Polystichum acrostichoides

Planting Time:
Flowering Time: No flowers, evergreen
Light: Partial shade / shade
Girth: 24" high, 24" apart
Soil: Prefers consistent soil moisture
Growth rate:
Prune:
Fertilize:
Other: Native Americans used the rhizomes of the plant to make a tea for chills, fevers, pneumonia, and to induce vomiting.
Common Name: East Friesland Hybrid Sage
Botanical Name: Salvia nemerosa 'east friesland'
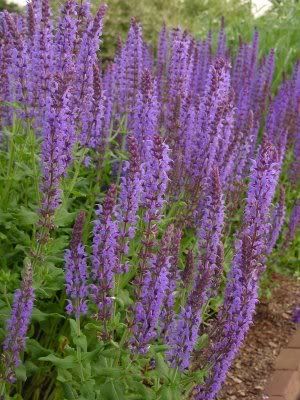
Planting Time:
Flowering Time: Summer to Fall
Light: Full sun
Girth: 24" high, 18-24" spread
Soil: Semi Moist
Growth rate: Medium
Prune: To increase bloom time, it should be cut back after the first bloom. Propagate by division or cuttings in early summer.
Fertilize:
Other: Tolerances: deer, drought, heat & humidity, seashore, and slope. ‘East Friesland’ is a magnet for butterflies, bees and hummingbirds and is deer-resistant. It is hardy for container gardening and provides excellent cut flowers.
Common Name: Golden Coral Bells
Botanical Name: Heuchera 'Amber Waves'

Planting Time:
Flowering Time:
Light: Part shade / They grow most vigorously and have the stongest colors when grown in partial shade (preferably afternoon shade)
Girth: 8" high, 17" wide
Soil: Moderately moist rich soil, good drainage and a neutral PH
Growth rate: Moderate (to slow if planted in full shade)
Prune:
Fertilize:
Other: Propagation Methods: By dividing the rootball or from herbaceous stem cuttings / Seed Collecting: N/A: plant does not set seed, flowers are sterile, or plants will not come true from seed. Heucheras can be grown under Black Walnut trees because they are resistant to the toxin Juglone which the trees emit from their roots. Heucheras are also salt tolerant. They are useful in the north along pathways which are salted in winter or for people gardening in coastal regions.
Common Name: Mediterranean Bells
Botanical Name: Nectaroscordum Siculum
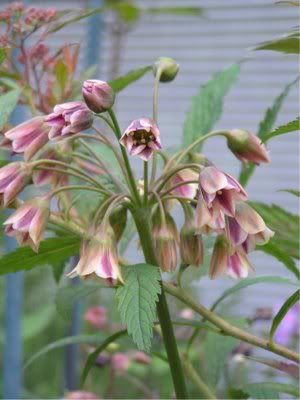
Planting Time: Sept. - Dec.
Flowering Time: May - June
Light: Sun / Partial Shade
Girth: 30" high, 4" between plants
Soil:
Growth rate: fast
Prune: Deadhead spent flowers, cut back leaves once they've browned completely
Fertilize: After the plant flowers
Other: Mulch overwinter to protect from severe frost
Common Name: Red Hot Poker, Poker Lilly, Torch Flower
Botanical Name: Kniphofia 'Coral Glow'
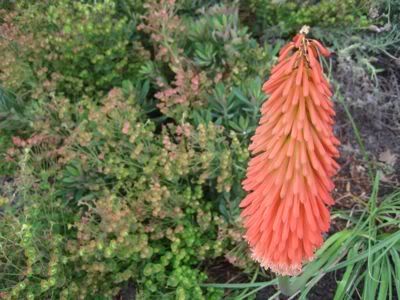
Planting Time:
Flowering Time: Summer
Light: Sun, part shade
Girth: 3' high, 2' wide
Soil:
Growth rate:
Prune:
Fertilize:
Other: Natives of Madagascar and tropical South Africa they were brought to England in 1707, and kept as greenhouse treasures until 1848, when someone had the bright idea of planting them outdoors, and their abiding hardiness was discovered. Heat and drought tolerant they are also loved by hummingbirds.
Common Name: Siberian Bugloss or Perennial Forget-me-not
Botanical Name: Brunnera macrophylla 'Jack Frost'
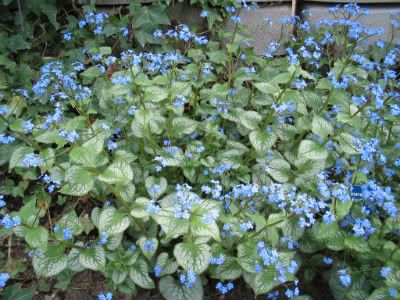
Planting Time:
Flowering Time:
Light: part shade / shade
Girth: 8-10" high, 12" between plants
Soil:
Growth rate:
Prune:
Fertilize:
Other: A native of Siberia as the common name suggests, it is frost hardy and has large branched clusters of pale blue flowers which resemble the blooms of the hardy biennial Forget-me-not.
Common Name: Silver Mound
Botanical Name: Artemisia schmidtiana
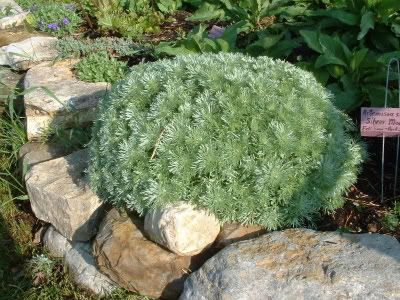
Planting Time:
Flowering Time: No flowers
Light: Full sun / partial shade
Girth: 12" high, 12-18" wide
Soil: Plant in well drained soil. Excess water can cause root rot.
Growth rate:
Prune: Cut the plant back to 1" (2.5 cm) at the end of the growing season or before growth restarts in the spring.
Fertilize:
Other: The species is native to northern Japan and its island chains leading to Siberia. It is found in rocky sites in nature.
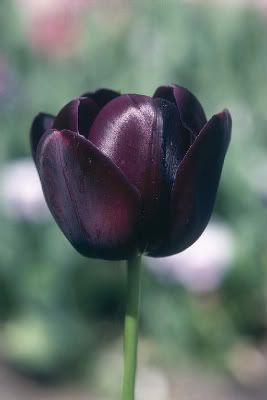
Common Name: Tulip 'Blue Diamond'
Botanical Name: Tulipa doulbe late
Planting Time: Sept. - Dec.
Flowering Time: April - May
Light: Sun / Partial Shade
Girth: 20" high, 4" between plants
Soil:
Growth rate: fast
Prune: Deadhead spent flowers, cut back leaves once they've browned completely
Fertilize: After the plant flowers
Other: Mulch overwinter to protect from severe frost
Common Name: Tulip 'Kikomachi'
Botanical Name: Tulipa (Triumph)
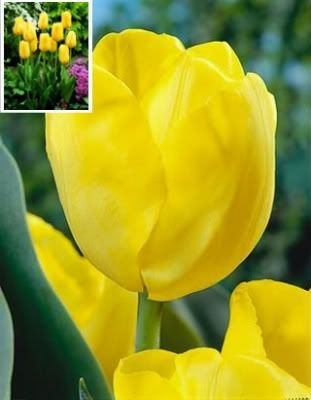
Planting Time:
Flowering Time: Mid spring, Flowers are fragrant
Light: full to partial sun
Girth: 12" high / 6" - 9" between plants
Soil: 5.6 to 6.0 (acidic) / 6.1 to 6.5 (mildly acidic) / 6.6 to 7.5 (neutral) - well drained
Growth rate:
Prune: Remove faded flowers, but do not cut back the stems before Autumn.
Fertilize:
Other:DANGER: Parts of plant are poisonous if ingested Propagation Methods: By dividing rhizomes, tubers, corms or bulbs (including offsets). Seed Collecting: N/A: plant does not set seed, flowers are sterile, or plants will not come true from seed. Zones 4a to 10b
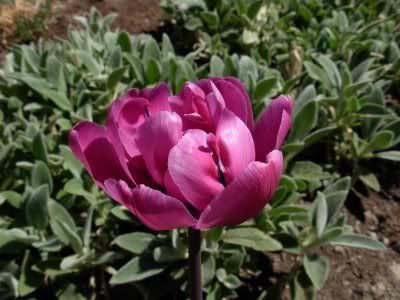
Common Name: Tulip 'Queen of Night'
Botanical Name: Tulipa single late
Planting Time: Sept. - Dec.
Flowering Time: May
Light: Sun / Partial Shade
Girth: 24" high, 4" between plants
Soil:
Growth rate: fast
Prune: Deadhead spent flowers, cut back leaves once they've browned completely
Fertilize: After the plant flowers
Other: Mulch overwinter to protect from severe frost
Common Name: Wallflower
Botanical Name: Erysimum linifolium 'Variegata'
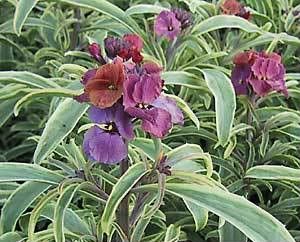
Planting Time:
Flowering Time: May to August, evergreen
Light: Sun to part shade
Girth: 20" high, 20" wide
Soil: Good drainage, drought tolerant
Growth rate:
Prune:
Fertilize:
Other: Propagation Methods: From softwood cuttings / Seed Collecting: N/A: plant does not set seed, flowers are sterile, or plants will not come true from seed
Common Name: Sunshine Dahlia
Botanical Name:

Planting Time: Spring (Feb-May)
Flowering Time: July till Frost
Light: Full Sun
Girth: 14" high x 12-20"
Soil:
Growth rate:
Prune: Dead head to promote more flower growth
Fertilize:
Other: Hardy in zones 8-10 otherwise dig up and overwinter in dry peat - plant again the following spring.
Common Name: Alfred Grille Dahlia
Botanical Name:

Planting Time: Spring (Feb-May)
Flowering Time: July till Frost
Light: Full Sun
Girth: 36" high x 12-20"
Soil:
Growth rate:
Prune: Dead head to promote more flower growth
Fertilize:
Other: Propagation Methods:
Common Name: Thomas A. Edison Dahlia
Botanical Name:

Planting Time: Spring (Feb-May)
Flowering Time: July till Frost
Light: Full Sun
Girth: 36" high x 12-20"
Soil:
Growth rate:
Prune: Dead head to promote more flower growth
Fertilize:
Other: Propagation Methods:
Common Name: Anemone 'Royale'
Botanical Name:

Planting Time:
Flowering Time: Spring
Light:
Girth:
Soil:
Growth rate:
Prune:
Common Name: Autumn Fern
Botanical Name: Dryopteris erythrosora

Planting Time:
Flowering Time: No flowers, evergreen
Light: full shade / part shade
Girth: 18-24" high, 2' between plants
Soil: Plant in moist, rich, well drained soil in partial shade
Growth rate: Slow
Prune: In spring, when new fronds begin to unfurl, cut back spent foliage
Fertilize:
Other:
Common Name: Blue Star Creeper
Botanical Name: Laurentia fluviatilis

Planting Time:
Flowering Time: May to Sept
Light: sun to partial shade
Girth: 2" high, spreading
Soil: Will tolerate most soils and foot traffic
Growth rate:
Prune:
Fertilize:
Other: Propagation Methods: By dividing the rootball
Common Name: Bronze New Zealand Flax
Botanical Name: Phormium tenax 'Atropurpurea'

Planting Time:
Flowering Time: late spring, evergreen
Light: full sun / partial sun
Girth: 6-8' high, 2' between plants
Soil: Plant in most any well-drained soil
Growth rate:
Prune:
Fertilize:
Other: This is the red foliage form of the species and is one of the toughest of the New Zealand Flax - tolerates inland heat and colder temperatures than most of the hybrids.
Common Name: Christmas Fern
Botanical Name: Polystichum acrostichoides

Planting Time:
Flowering Time: No flowers, evergreen
Light: Partial shade / shade
Girth: 24" high, 24" apart
Soil: Prefers consistent soil moisture
Growth rate:
Prune:
Fertilize:
Other: Native Americans used the rhizomes of the plant to make a tea for chills, fevers, pneumonia, and to induce vomiting.
Common Name: East Friesland Hybrid Sage
Botanical Name: Salvia nemerosa 'east friesland'

Planting Time:
Flowering Time: Summer to Fall
Light: Full sun
Girth: 24" high, 18-24" spread
Soil: Semi Moist
Growth rate: Medium
Prune: To increase bloom time, it should be cut back after the first bloom. Propagate by division or cuttings in early summer.
Fertilize:
Other: Tolerances: deer, drought, heat & humidity, seashore, and slope. ‘East Friesland’ is a magnet for butterflies, bees and hummingbirds and is deer-resistant. It is hardy for container gardening and provides excellent cut flowers.
Common Name: Golden Coral Bells
Botanical Name: Heuchera 'Amber Waves'

Planting Time:
Flowering Time:
Light: Part shade / They grow most vigorously and have the stongest colors when grown in partial shade (preferably afternoon shade)
Girth: 8" high, 17" wide
Soil: Moderately moist rich soil, good drainage and a neutral PH
Growth rate: Moderate (to slow if planted in full shade)
Prune:
Fertilize:
Other: Propagation Methods: By dividing the rootball or from herbaceous stem cuttings / Seed Collecting: N/A: plant does not set seed, flowers are sterile, or plants will not come true from seed. Heucheras can be grown under Black Walnut trees because they are resistant to the toxin Juglone which the trees emit from their roots. Heucheras are also salt tolerant. They are useful in the north along pathways which are salted in winter or for people gardening in coastal regions.
Common Name: Mediterranean Bells
Botanical Name: Nectaroscordum Siculum

Planting Time: Sept. - Dec.
Flowering Time: May - June
Light: Sun / Partial Shade
Girth: 30" high, 4" between plants
Soil:
Growth rate: fast
Prune: Deadhead spent flowers, cut back leaves once they've browned completely
Fertilize: After the plant flowers
Other: Mulch overwinter to protect from severe frost
Common Name: Red Hot Poker, Poker Lilly, Torch Flower
Botanical Name: Kniphofia 'Coral Glow'

Planting Time:
Flowering Time: Summer
Light: Sun, part shade
Girth: 3' high, 2' wide
Soil:
Growth rate:
Prune:
Fertilize:
Other: Natives of Madagascar and tropical South Africa they were brought to England in 1707, and kept as greenhouse treasures until 1848, when someone had the bright idea of planting them outdoors, and their abiding hardiness was discovered. Heat and drought tolerant they are also loved by hummingbirds.
Common Name: Siberian Bugloss or Perennial Forget-me-not
Botanical Name: Brunnera macrophylla 'Jack Frost'

Planting Time:
Flowering Time:
Light: part shade / shade
Girth: 8-10" high, 12" between plants
Soil:
Growth rate:
Prune:
Fertilize:
Other: A native of Siberia as the common name suggests, it is frost hardy and has large branched clusters of pale blue flowers which resemble the blooms of the hardy biennial Forget-me-not.
Common Name: Silver Mound
Botanical Name: Artemisia schmidtiana

Planting Time:
Flowering Time: No flowers
Light: Full sun / partial shade
Girth: 12" high, 12-18" wide
Soil: Plant in well drained soil. Excess water can cause root rot.
Growth rate:
Prune: Cut the plant back to 1" (2.5 cm) at the end of the growing season or before growth restarts in the spring.
Fertilize:
Other: The species is native to northern Japan and its island chains leading to Siberia. It is found in rocky sites in nature.
Common Name: Tulip 'Blue Diamond'
Botanical Name: Tulipa doulbe late

Planting Time: Sept. - Dec.
Flowering Time: April - May
Light: Sun / Partial Shade
Girth: 20" high, 4" between plants
Soil:
Growth rate: fast
Prune: Deadhead spent flowers, cut back leaves once they've browned completely
Fertilize: After the plant flowers
Other: Mulch overwinter to protect from severe frost
Common Name: Tulip 'Kikomachi'
Botanical Name: Tulipa (Triumph)

Planting Time:
Flowering Time: Mid spring, Flowers are fragrant
Light: full to partial sun
Girth: 12" high / 6" - 9" between plants
Soil: 5.6 to 6.0 (acidic) / 6.1 to 6.5 (mildly acidic) / 6.6 to 7.5 (neutral) - well drained
Growth rate:
Prune: Remove faded flowers, but do not cut back the stems before Autumn.
Fertilize:
Other:
Common Name: Tulip 'Queen of Night'
Botanical Name: Tulipa single late

Planting Time: Sept. - Dec.
Flowering Time: May
Light: Sun / Partial Shade
Girth: 24" high, 4" between plants
Soil:
Growth rate: fast
Prune: Deadhead spent flowers, cut back leaves once they've browned completely
Fertilize: After the plant flowers
Other: Mulch overwinter to protect from severe frost
Common Name: Wallflower
Botanical Name: Erysimum linifolium 'Variegata'

Planting Time:
Flowering Time: May to August, evergreen
Light: Sun to part shade
Girth: 20" high, 20" wide
Soil: Good drainage, drought tolerant
Growth rate:
Prune:
Fertilize:
Other: Propagation Methods: From softwood cuttings / Seed Collecting: N/A: plant does not set seed, flowers are sterile, or plants will not come true from seed
How Can It Be Fall Already?
Ug. I went outside this morning and could see my breath. It was 42*! That's *wrong*! I'm such a cold wimp. The rain is also back. I'm not ready! I still want to play outside in the dirt and flowers and sunshine. I've got one last hurrah planned for Sunday where my family is coming over to help with some major back yard clean up. Fingers crossed for dry weather. I hope we're able to get a lot done. Might even spruce up the front a bit too. I've been resisting buying bulbs but it's so hard. I have a least three bags worth I need to get in the ground before Halloween. I'm not sure where I'm going to put them. I was thinking the new back bed but it feels rushed. I want to plan that out a little better. There's always room in the front especially on the kinda empty part of the hell strip that we recently cleaned up. I'm just wondering if they'd get enough sun there once the dogwood leafs out in the spring.
Thursday, September 18, 2008
A work in progress
After having suffered the stomach flu for too long I was finally able to make it to the local McDepot for more blocks to work on the wall. It was soooo stinking satisfying to get some gardening done today! That's all I've wanted to do for the past two weeks - it's been killin' me I haven't been able to.
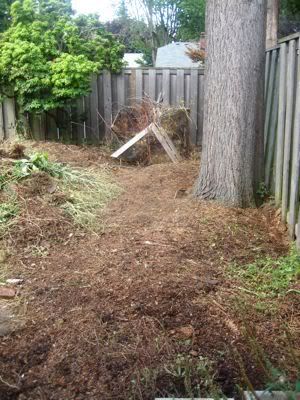
This afternoon I worked on dismantling our old compost pile. (It's right in the path of the new wall.) What a PITA. Luckily I inherited Grandpa Jack's old pitch fork to help with this unpleasant chore. Can I just say that it's the *coolest* tool ever?! With ease I moved all the larger non-degraded material off the top of the pile (sticks, small branches, matted grass clippings, etc) to another pile and then just spread the yummy compost at the bottom of the pile around the area to flatten it out a bit. Once that was done I could work on the wall. I continued to stack brick until I ran out of foundation sand. Grrr! I so wanted to use up all the bricks I had. Ah well. I hope I'll get to go back tomorrow and get more sand and more wall brick. I'm really excited for all of this to come together! I need to do some homework but I think planting blueberries in this new bed would be a brilliant idea! (NO idea if they'll grow there or not - like I said, homework) But I'm just envisioning an apple tree near by with blueberries and a large kitchen garden... ah. I love a yard you can graze in. lol... ;^) Food me!
This afternoon I worked on dismantling our old compost pile. (It's right in the path of the new wall.) What a PITA. Luckily I inherited Grandpa Jack's old pitch fork to help with this unpleasant chore. Can I just say that it's the *coolest* tool ever?! With ease I moved all the larger non-degraded material off the top of the pile (sticks, small branches, matted grass clippings, etc) to another pile and then just spread the yummy compost at the bottom of the pile around the area to flatten it out a bit. Once that was done I could work on the wall. I continued to stack brick until I ran out of foundation sand. Grrr! I so wanted to use up all the bricks I had. Ah well. I hope I'll get to go back tomorrow and get more sand and more wall brick. I'm really excited for all of this to come together! I need to do some homework but I think planting blueberries in this new bed would be a brilliant idea! (NO idea if they'll grow there or not - like I said, homework) But I'm just envisioning an apple tree near by with blueberries and a large kitchen garden... ah. I love a yard you can graze in. lol... ;^) Food me!
Tuesday, September 16, 2008
Mushroom Compost
My neighbor rapped on my door a few days ago wanting to know if she could borrow our weekend warrior (Ol' Penny, our pick up truck) to make run over to Wood Waste Management. She wanted to get a yard of compost. I'd loaned her the truck a few days earlier and she didn't get quite enough and needed to go back for more. She's just entering the world of gardening and is kinda jumping in feet first at the deep end of the pool. For the past three years her yard had consisted mostly of dead lawn, a pine tree and several struggling spidery rhododendrons. About a year and half ago she had it professionally landscaped. They removed ALL of the lawn (and the rhodies) and put in a beautiful naturalistic landscape. Of course it's gorgeous but now she needs to take care of it. So she's been asking me a few questions here and there about taking care of plants and gardening in general. I do not consider myself an expert in any way shape or form but since I do love it I read up on the things that interest me and eventually some of it sinks in. Heh. So when she came by to ask if she could borrow the truck again she also asked what the difference was between "regular compost" and "mushroom compost". I was stumped. I told her by the time she came to get the keys (in a few days) I'd let her know.
The upshot being I personally don't think it's worth it to use Mushroom compost. All the good bacteria is steralized out of it and most of the nutrients used up in growing mushrooms. It's finer and can cause crusting problems as well. If you have the time you could let the pile sit after adding a "starter" to it like compost tea or other product marketed for this sort of thing. However when I pick up a load of compost I usually have a plan for it right away - so that's not really an option for me. The other thing that I keep reading about that bothers me are the actual raw materials for the compost to begin with.
Hay, straw, and corn cobs do not have an abundance or variety of minerals and nutrients to begin with. Horse manure is a little better when the horses themselves have been fed a variety of foods other than grasses (apples, oats, etc) and chicken poop maybe the best with a varied diet of protein (bugs) and seeds which offer the densest concentration of nutrients, plus the occasional berry and etc. (Assuming the manure source comes from "organic" free range chickens.) However since we don't know exactly what the Mushroom compost's original recipe is, or where their materials are sourced from, it's hard to tell how well it would perform even if it wasn't sterilized twice and the bulk of the nutrients used on growing mushrooms. Whereas at least with "regular" compost there's no steam sterilization, and a wide variety of original ingredients will bless the pile adding a diversity of minerals and nutrients and microorganisms. I'm all for that. Plus it's cheaper.
*Source
**Source
How Spent Mushroom Compost is Made
Mushroom compost is normally made in a hot composting process with straw, animal manure and gypsum. Sometimes leaves or ground corn cobs are used in place of the straw. As you probably noticed, this is a much simpler recipe than you will find in most home compost piles.
There are usually other nutrients added either while composting or after composting. Many of them are organic in nature, such as blood meal, or cottonseed meal, but sometimes there are inorganic additives such as urea.
The pile is allowed to heat up to about 160 degrees and turned several times, just as you would do with your home compost pile, except on a much larger scale. The mushroom farm down the street from me uses those giant straw bales that are shipped one per semi trailer.
Now, unlike your home garden pile, they don't let the compost sit and age at this point. They take the compost, load it into planting beds and then they steam pasturize everything!
That's right, they kill off all those wonderful micro-organisms that will continue the composting process and are so important to your garden!
Of course, they aren't thinking about your garden, they are thinking about getting rid of the competition for the mushrooms, and there are a lot of strains of wild fungi in that compost.
Then they top the bed off with a couple of inches of peat moss, and innoculate the bed with the mushroom spawn. They get their first harvest in about a month, and continue harvesting for the next 6 to 10 weeks.
After they are done, they steam sterilize the bedding again, and sell it as spent mushroom compost.*
The upshot being I personally don't think it's worth it to use Mushroom compost. All the good bacteria is steralized out of it and most of the nutrients used up in growing mushrooms. It's finer and can cause crusting problems as well. If you have the time you could let the pile sit after adding a "starter" to it like compost tea or other product marketed for this sort of thing. However when I pick up a load of compost I usually have a plan for it right away - so that's not really an option for me. The other thing that I keep reading about that bothers me are the actual raw materials for the compost to begin with.
This compost is made by mushroom producers from material such as hay, straw, corn cobs, poultry and horse manure – or any combination of organic material that is 1) inexpensive and 2) readily available.**
Hay, straw, and corn cobs do not have an abundance or variety of minerals and nutrients to begin with. Horse manure is a little better when the horses themselves have been fed a variety of foods other than grasses (apples, oats, etc) and chicken poop maybe the best with a varied diet of protein (bugs) and seeds which offer the densest concentration of nutrients, plus the occasional berry and etc. (Assuming the manure source comes from "organic" free range chickens.) However since we don't know exactly what the Mushroom compost's original recipe is, or where their materials are sourced from, it's hard to tell how well it would perform even if it wasn't sterilized twice and the bulk of the nutrients used on growing mushrooms. Whereas at least with "regular" compost there's no steam sterilization, and a wide variety of original ingredients will bless the pile adding a diversity of minerals and nutrients and microorganisms. I'm all for that. Plus it's cheaper.
*Source
**Source
Friday, September 12, 2008
Rain Barrels
I've been thinking a lot about rain catchment systems lately. I know you're probably thinking, why in the world would you need to catch rain when you live in the rainy PNW? Well my friends let me give you my top three reasons:
1. For one, we get dinged by the water company for all the water that goes down our drain pipes and into the sewer. In our case the people who lived here before us actually had pipes installed to catch the down spout water and direct it INTO the sewer system. They were crazy. (But that's another story). So we have horrendously high water bills in the winter when we're not using a lot of water. If you use a rain barrel you get credits and it lowers your bill... (I'm not sure exactly how it works but something to that effect - believe me when I get my barrel(s) I'll find out).
2. It actually does stop raining for about two and half months out of the year. Which means that yes, we have horrendously high water bills in the summer too when we are using a lot of water! Wouldn't it be nice to actually take some of that late spring rain and put it to good use? I think so.
3. Rain water is generally very clean oxygenated water that is quite good for plants. When used from a barrel the temperature is more ambient to the air temp and won't shock the plants like faucet water can. (I know our tap water is *cold*) I'd like to, especially for a kitchen garden, use water that's a little warmer and cleaner then what comes out of the tap.
Now comes the question of which one to get? What's practical for us? There are of course many options.
1. Craig's List has food grade opaque* 50 gallon plastic drums that you have to convert into rain barrels yourself. The price is sure right though at $25 a pop. Of course you then still need to buy or get a hold of a spigot, plumbers tape, calking, a drill and bit, various hoses, etc. So the price goes up from there.
2. Plastic barrels. There are many, many different kinds of these. Engage in some Google Fu and you can take your pick of the litter. Prices range usually from $75 - $700 depending on storage capacity, multiple barrels, diversion kits, installation, shipping, etc.
3. Wood barrels. Again, many different kinds, many different prices.
If I had an old farm house I would getting a much different barrel then the one I'm considering. But since the house I live in isn't too rural or "farmy" I'd like something that doesn't scream "old oak barrel". I'm quite fond of this one; it's simple and doesn't look like a rain barrel! Plus it will fit in the front of the house in a narrow space I have reserved for it. I may consider getting a different one for the back yard that holds more water but isn't as aesthetically pleasing. More on that later.
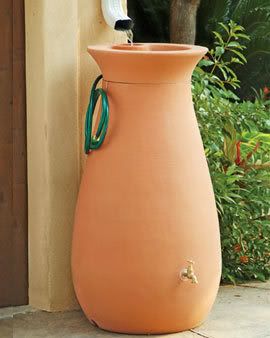
65 Gallon Urn
Since we also get a lot of rain I actually have to worry about serious overflow issues. I can't have the barrel filling up and out and washing away - everything! It wouldn't take long either. We average 42.7 inches (1080 mm) per year. If you have 1000 square feet of roof at 1" of rain = 625 gallons of water. Theoretically if I had enough barrels I could store 26,687.5 gallons a year!!! So one paltry 65 gallon barrel isn't going to cut it. Which means that I would also need this cool little doo-hicky.
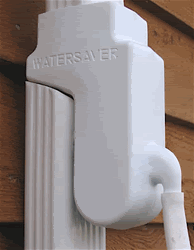
Garden Watersaver Downspout attachment
What it does is basically lets your barrel fill all the way up and then redirects the water back down the downspout automatically. Since I can't stand there and watch my rain barrel levels 24/7 this is awfully convenient. It also means I don't have to worry about an overflow valve on the barrel itself. Which are convenient if you have a place for it to drain off to but in our case, being in a fairly urban environment, we don't really have a lot of options for runoff. It can go down the drain or I could build a drain field but I have neither the time, energy or space for one currently.
A really great option for the back yard, especially once I have the raised beds in, would be this guy:
The Garden Drip Irrigation System
I'm sad - it seems the whole page was taken down for the kit that you could make, so no more link. It was a rain barrel turned on it's side and elevated nearly five feet off the ground in order to create enough pressure to force the water out of a soaker hose. It was pretty cool. I'm sorry it's gone. (and damn me for hotlinking it to begin with! I should've nicked the picture and hosted it myself - ah, lesson learned)
"The drum is mounted on a 54 inch high stand which gives the height needed to produce the 2 psi required to operate the drip irrigation kit when attached. If you use all the material in the kit it will water a 100 sq. ft. garden (ten - 10 foot rows or five - 20 foot rows)." I'm still not sure about the aesthetics of this - or the size! - but I like its functionality. I think I need to look at where the downspout is and take some measurements. It maybe too large to fit into that space up against the house with where our windows are placed, etc. If it is I would most likely get the same barrel as I use in the front.
All told I'd eventually like to get three barrels. That would cover the front of the house, the back of the house and I'd be able to catch 1/2 the water off the garage roof (which is still nearly 300 sq ft) and would water the plants on the other side of the back yard. While I won't be getting these all right away (even though I'd like to!) I hope to be getting at least one soon. I'll be sure to post back on performance, ease of instillation and how much I like it!
*Best to not get the translucent barrels as it allows for fungal growth in the standing water.
Wednesday, September 10, 2008
The Wall
So one of my current projects is to get a small retaining wall up in the back yard. The dirt was just mounded up around the base of the evergreen. It was like this when we got here. It looks really odd. I'd like to make it look intentional. That's the problem with our back yard. There was no thought really to where anything was planted or placed. If I had the money I'd rip it down to the dirt and start over completely. Ah well. Someday when I win the lottery. ;^)

This is the tree "before". Sadly it's really hard to tell that it's on a slope.
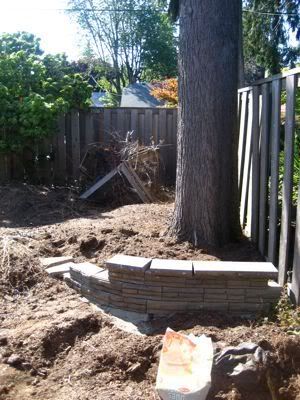
Here we are in progress. While it's still difficult to see the slope the dirt behind the wall actually goes up to the bottom of the third brick.
Anyway I've been a bit frustrated this week because I really want to keep working on it! But so many other things have gotten in the way. I wish I could get back to it. The weather's been lovely and I want to take advantage of the sunny dry days before the rain comes back. I was going to do a half circle just around the base of the tree but I had an epiphany the other day standing there looking at it wishing I had more bricks. What if I run it straight back to the fence? Then it would give the corner some purpose. As it is right now it's just a nowhere man's land. At least with a bed it feels more "included" in the rest of the yard. I'm also planning on pulling out the bush to the left (who's name is currently eluding me) and replacing it with an apple tree.
I grew up above apple orchards and for all the PITA that pruning them is, it's worth it in the fall to just walk out the back door and snap a warm apple off the tree. I'm looking forward to getting to do that someday. Now in the meantime I need to go remove that pile of detritus* that's in my future walls way. (I've been waiting for them to collect the yard debris so I have empty cans again. I've filled four large bins so far with weeds! How did I ever let it get to this sad sorry state?)
*Actually the remains of the compost bin and heap that needs to move to a new spot anyway. For now I'm just letting our recycler have it.
Tuesday, September 9, 2008
One Mud Monkey's Adventures in Organic Gardening
Hello! Since this is my first post and there's no readership to speak of does it really matter what I say? ::smiles and crinkles up nose:: Well yes, I guess it does. It matters what we do when people are looking and when they're not. It matters how we treat ourselves, each other and how we treat the earth. I strongly believe in using organic methods in the garden and leaving the chemicals and pesticides behind. I believe that compost is a great ally. If you start with healthy soil you will gain healthy plants that will be more resistant to disease and pests. When I first started gardening in ernest about seven years ago I had someone tell me that "90% of gardening is in the dirt", meaning that what you do "down there" really effects what comes up - work your dirt not your plants. They couldn't have been more right.
With that said a little history of mine if you will... I didn't start really gardening until I moved to Oregon even though I've always loved dirt (I was a ceramic major in college - now there's a useful degree lol). I only wish that I'd discovered gardening so much sooner! I moved into a small rental that had, to my new eyes, "a plot of dirt". I didn't have a very good idea of what to do with it or what state it had been in so I figured it wouldn't hurt to amend the soil with some chicken poop. I amended, tilled, watered and plunked in some starts (many at the *wrong* time of year!) Well I was new. We stayed in that house for a few years and I came to understand the soil and the plants and their life cycle. In the meantime I bought some books and read up on gardening an discovered zones and seasons and cover crops and compost and bulbs and flowers and so, so many wonderful things. I became a gardener!
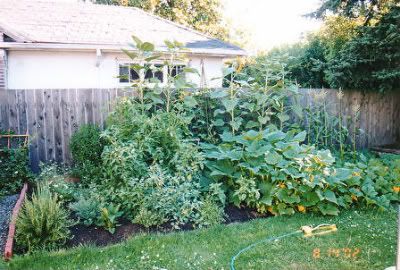
This was my little plot of dirt two years into the world of discovery that is gardening
Then came "the move". We bought a house. I was crest fallen. It was all vinca and mock orange in the front yard and grass and *all* shade in the back yard. How was I going to get a kitchen garden?! There were many things that needed to be worked on and so the inside took priority though I tried to pull out some of the weeds and vines. It took nearly two years before we could take a good stab at the front yard. (Note that DH and gardening are like oil and water so this was a great accomplishment!) I designed the whole front from scratch and we literally ripped *everything* out.

The day we bought the house
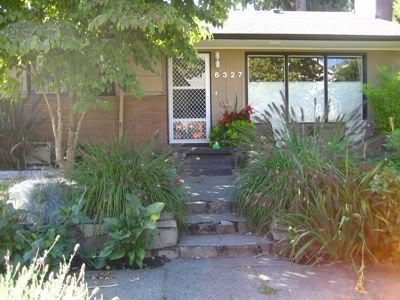
Currently
We added hardscaping with the addition of two walkways across our hell strip and a small patio in under the front windows (in leu of a front porch) and a path under the dogwood to the side yard.
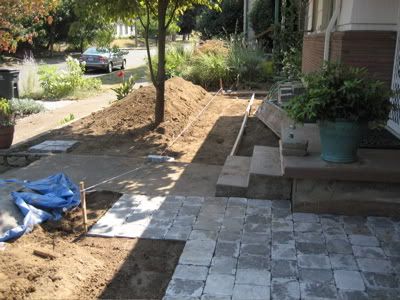
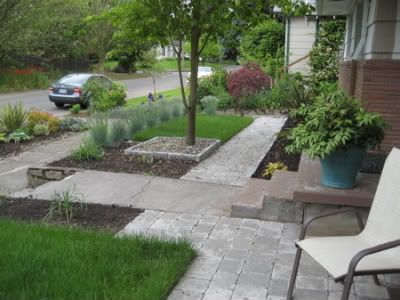
It's funny to look back at how small the plants were! It was such new landscaping then
I also took a stab at the side yard. I wish I could say it still looked this nice. Unfortunately that clover is so invasive that in a matter of months it'd "eaten" up everything again. At this point I'm resigned to leaving the path and the ferns which seem to hold their own against the onslaught of clover. I pulled out all the other plants that survived and moved to my folks house where they are happily thriving - clover free! Their whole yard is a beautiful park like shade garden. This is the only truly shady spot on all of our property (which isn't much either way! lol).
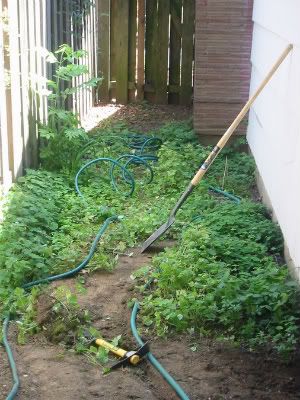
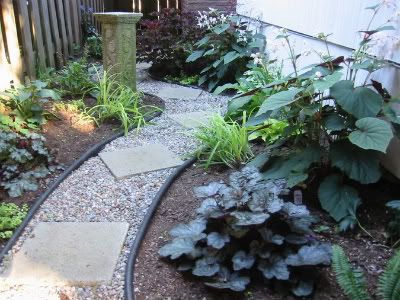
And so now you join us at the point where we're moving forward. I still have the whole back yard to tackle! I've been waiting for DH to make raised garden beds for years now and have given up. I'm taking the bull by the horns so to speak and will be working on the back yard by myself. Just a little a day - chip, chip, chip. I hope you can join me in watching it blossom into a wonderful place to be instead of the annoying weed patch it is. I can't live without my kitchen garden another season. This fall I hope to accomplish so much. And now I will leave you with a photos of some of my delights...
Subscribe to:
Posts (Atom)